cmd.exe나 PowerShell에서 Python3를 실행하는 경우, Tab키를 이용한 자동 완성 기능이 안된다. 이를 해결하기 위해선, 간단히 다음의 패키지를 설치하면 됨.
> pip install -U pyreadline
pyreadline은 Python3 실행 시 윈도우에서 자동 완성기능을 담당하는 패키지임.
Ubuntu에서는 당연히 되던 기능인데, 윈도우 환경에선 안되길래 검색해보니 해결 방법이 바로 보임.
cmd.exe나 PowerShell에서 Python3를 실행하는 경우, Tab키를 이용한 자동 완성 기능이 안된다. 이를 해결하기 위해선, 간단히 다음의 패키지를 설치하면 됨.
> pip install -U pyreadline
pyreadline은 Python3 실행 시 윈도우에서 자동 완성기능을 담당하는 패키지임.
Ubuntu에서는 당연히 되던 기능인데, 윈도우 환경에선 안되길래 검색해보니 해결 방법이 바로 보임.
설치환경, Ubuntu 24.04
설치할 때, 언어는 영어(English)로 하는 것을 추천. 한글 입력은 https://ahnbk.dev/?p=368 참고.
ROS2 설치에 대한 자세한 설명은 공식 문서 페이지를 참조. (https://docs.ros.org/en/jazzy/Installation/Ubuntu-Install-Debians.html)
Repository 설정
$ sudo apt install software-properties-common
$ sudo add-apt-repository universe
$ sudo apt update && sudo apt install curl -y
$ sudo curl -sSL https://raw.githubusercontent.com/ros/rosdistro/master/ros.key -o /usr/share/keyrings/ros-archive-keyring.gpg$ echo "deb [arch=$(dpkg --print-architecture) signed-by=/usr/share/keyrings/ros-archive-keyring.gpg] http://packages.ros.org/ros2/ubuntu $(. /etc/os-release && echo $UBUNTU_CODENAME) main" | sudo tee /etc/apt/sources.list.d/ros2.list > /dev/nullROS2 개발에 필요한 툴들을 모아놓은 메타 패키지 설치 (옵션)
$ sudo apt update
$ sudo apt install ros-dev-tools
ROS2 설치 시작
$ sudo apt update
$ sudo apt install ros-jazzy-desktop
DDS 설치. 기본으론 FastRTPS가 설치되어 있으나, CycloneDDS을 사용하는 것을 권장함
$ sudo apt install ros-jazzy-rmw-cyclonedds-cpp
$ echo "export RMW_IMPLEMENTATION=rmw_cyclonedds_cpp" >> ~/.bashrc
환경설정
$ echo "source /opt/ros/jazzy/setup.bash" >> ~/.bashrc도메인 아이디 설정
$ echo "export ROS_DOMAIN_ID=<your_domain_id>" >> ~/.bashrcJazzy 버전부터는 DDS를 이용한 자동 연결 기능에 대한 범위를 환경변수로 설정 가능
$ echo "export ROS_AUTOMATIC_DISCOVERY_RANGE=<discover option>" >> ~/.bashrc옵션값은 다음의 한 종류를 선택
SUBNET : 현재 서브넷 설정 (예: 255.255.255.0)에 따라 Node 발견(Discover) 및 연결 (Default)
LOCALHOST : 현재 머신 내에서만 Node 발견(Discover) 및 연결
OFF : 다른 노드와 연결하지 않음, 단독 실행
SYSTEM_DEFAULT : 초기값 사용 (SUBNET)
설정이 끝난 다음, source나 터미널 재실행으로 환경변수 셋업 적용
$ source ~/.bashrc개발툴(colcon) 설치 및 설정
$ sudo apt install python3-colcon-common-extensionscolcon_cd 명령 사용을 위한 환경변수 셋업
$ echo "source /usr/share/colcon_cd/function/colcon_cd.sh" >> ~/.bashrc
$ echo "export _colcon_cd_root=/opt/ros/jazzy/" >> ~/.bashrc
$ echo "source /usr/share/colcon_argcomplete/hook/colcon-argcomplete.bash" >> ~/.bashrc
workspace 디렉토리 생성
$ mkdir -p ~/dev_ws/src
$ cd ~/dev_ws
빌드
$ colcon build --symlink-install현재 workspace 사용하도록 환경변수 설정
$ echo "source ~/dev_ws/install/setup.bash" >> ~/.bashrcrosdep 설치
$ sudo apt install python3-rosdep
$ sudo rosdep init
$ rosdep update
vcstool 설치
$ sudo apt install python3-vcstool이것으로 일단 기본 설치 및 환경 셋업 완료.
설치는 간단히 다음과 같이 입력하여 설치
$ sudo apt install neovim다음으로, 기본 vi, vim 커맨드를 입력시 자동으로 nvim으로 연결하도록 설정한다.
$ sudo update-alternatives --config vim
There are 2 choices for the alternative vim (providing /usr/bin/vim).

  Selection    Path                Priority   Status
------------------------------------------------------------
  0            /usr/bin/nvim        30        auto mode
* 1            /usr/bin/nvim        30        manual mode
  2            /usr/bin/vim.basic   30        manual mode

Press <enter> to keep the current choice[*], or type selection number:
여기서 /user/bin/nvim을 선택하면, vim 입력시 nvim이 실행이 됨. 마찬가지로 vi에 대해서도 설정.
$ sudo update-alternatives --config vi
There are 2 choices for the alternative vi (providing /usr/bin/vi).

  Selection    Path                Priority   Status
------------------------------------------------------------
  0            /usr/bin/nvim        30        auto mode
* 1            /usr/bin/nvim        30        manual mode
  2            /usr/bin/vim.basic   30        manual mode

Press <enter> to keep the current choice[*], or type selection number:
마찬가지로 1번 선택.
alias나 심볼릭 링크를 번거롭게 설정하는 대신, 위와 같이 설정하면 간단히 해결됨.
현재 아이폰을 메인 회선으로 사용하고, 두 개의 아이패드를 데이터 함께쓰기로 사용하고 있습니다. 예전에는 아이패드를 변경하게 되면, 현재 꼽혀있는 유심을 뽑아서, 새로운 아이패드에 꼽으면 별다른 문제없이 사용할 수 있었는데, 올해 9월부터 약간의 정책이 바뀌었다고 합니다.
결론으론,
예전 아이패드에서 유심을 뽑기 전, 반드시 해당 기기의 전원을 정상적으로 종료해야 합니다. 전원이 정상적으로 종료된 이후에, 유심을 뽑아 새로운 기기에 꼽게 되면, 잠시 후 바로 통신이 가능하게 됩니다. 또 전원을 끈 이후 24시간이 지나면 안됩니다.
위 과정을 거치치 않으면, 해당 유심이 락이 걸려서 통신이 안되도록 한다고 합니다. 이때는 예전 기기에 다시 유심을 꼽고, 전원 종료를 해주시면 됩니다. 예전 기기가 없어진 상태거나, 사용하지 못하는 경우라면 어쩔수 없이 대리점에 방문해야 할 듯 하네요.
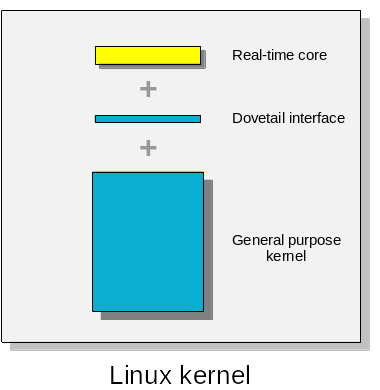
Xenomai는 기존 Linux 시스템의 커널과 병행하여 실행되며, Hard Realtime Task를 지원하는 소프트웨어 프레임웍입니다. 설치 방법도 간단하고, POSIX 인터페이스를 지원하여 개발도 쉽게 할 수 있습니다.
인터넷에서 Xenomai 설치 방법을 검색해보면, Xenomai2 버전과 예전 Linux 버전을 기준으로 설명해놓는 것들이 많고 (그만큼 인기가 없다는 얘기…) Xenomai3라고 해도 예전 iPipe를 사용하는 방법이 위주라서, 가장 최신 버전으로 Xenomai를 설치하는 방법을 정리해보았습니다.
물론 Xenoami도 Xenomai4 버전이 출시되어있긴 하지만, 아직까진 성능 검증 및 개발 방법에 대한 친절한 문서를 찾아보기가 힘들었습니다. 이 포스트는 Xenoami3, Ubuntu 22.04 버전을 기준으로 설명합니니다.
먼저 커널을 빌드하기 위한 툴을 설치합니다.
$ sudo apt install git build-essential libncurses-dev flex bison libelf-dev libssl-dev devscripts debhelper다음으로 작업할 임시 디렉토리를 하나 만들고, 그곳에 커널 및 Xenomai 라이브러리 소스를 받아옵니다.
$ mkdir ~/tmp
$ cd ~/tmp
$ wget https://source.denx.de/Xenomai/linux-dovetail/-/archive/v6.1.61-dovetail1/linux-dovetail-v6.1.61-dovetail1.tar.gz
$ wget https://source.denx.de/Xenomai/xenomai/-/archive/v3.2.4/xenomai-v3.2.4.tar.gz


$ tar zxf linux-dovetail-v6.1.61-dovetail1.tar.gz
$ tar zxf xenomai-v3.2.4.tar.gz
커널 버전은 자유롭게 선택이 가능합니다. 사용하는 디바이스 드라이버 및 소프트웨어 개발환경에 따라 적절히 선택해주면 됩니다. 저는 6.1.61 버전을 선택하였습니다. 이전에는 ipipe 패치를 해줘야 했지만, ipipe는 개발이 종료되었고, dovetail이 그 기능을 이어받아 개발 중입니다. 위 Repository에서는 dovetail이 패치된 커널 소스를 제공하고 있습니다. Xenomai 라이브러리는 가장 최신 버전인 3.2.4를 사용합니다.
Xenomai는 두 가지 모드로 실행이 가능한데, Cobalt는 기존 커널과 Xenomai 커널을 동시에 존재하고, 두 개의 커널 사이의 통신을 위해 dovetail을 이용합니다.
커널을 패치하기 위해 패치를 생성하고, 커널 소스에 적용해 줍니다.
$ cd ~/tmp/xenomai-v3.2.4/scripts
$ ./prepare-kernel.sh --linux=/home/robot/tmp/linux-dovetail-v6.1.61-dovetail1 --arch=x86_64 --outpatch=/home/robot/tmp/patch-cobalt-3.2.4.patch

$ cd ~/tmp/linux-dovetail-v6.1.61-dovetail1
$ patch -p1 < ../patch-cobalt-3.2.4.patch
이제 커널을 설정해줍니다. make menuconfig 를 이용하겠습니다. 현재 설치된 Ubuntu의 커널 설정을 복사하여 기본으로 사용합니다.
$ cd ~/tmp/linux-dovetail-v6.1.61-dovetail1
$ cp /boot/config-`uname -r` .config
$ make menuconfig
몇가지 필수 설정들이 필요하고, 그 외엔 사용하는 환경에 따라 커널 모듈 및 설정을 추가/삭제하면 됩니다.
General setup  --->
	Preemption Model (Preemptible Kernel --->
		(X) Preemptible Kernel (Low-Latency Desktop)

Processor type and features  --->
	Processor family (Generic-x86-64)  --->
		(X) Core 2/newer Xeon

	[*] Multi-core scheduler support
	[ ]   CPU core priorities scheduler support

Power management and ACPI options  --->
	CPU Frequency scaling  --->
		[ ] CPU Frequency scaling

	[*] ACPI (Advanced Configuration and Power Interface) Support  --->
		< >   Processor

	CPU Idle  --->
		[ ] CPU idle PM support

Memory Management options  --->
	[ ] Transparent Hugepage Support
	[ ] Allow for memory compaction
	[ ] Page migration
  [ ] Contiguous Memory Allocator


[*] Xenomai/cobalt (NEW)  --->
	Drivers  --->
		RTnet  --->
			<M> RTnet, TCP/IP socket interface
				Drivers  --->

    Real-time IPC drivers  --->
      <M> RTIPC protocol family
        [*]   XDDP cross-domain datagram protocol (NEW)
        [*]   IDDP intra-domain datagram protocol (NEW)
        (32)    Number of IDDP communication ports (NEW)
        [*]   Buffer protocol (NEW)
        (32)    Number of BUFP communication ports (NEW)
저장하고, 다시 터미널로 돌아옵니다.
빌드하기 전에 시스템 키 설 정 및 디버깅코드 생성을 중지하도록 설정해줍니다. 시스템 키 설정은 따로 키를 생성하지 않는 한 에러가 발생하고, 디버깅 코드의 생성 중지는 빌드를 조금 더 빠르게 해줍니다.
$ scripts/config --disable SYSTEM_TRUSTED_KEYS
$ scripts/config --set-str CONFIG_SYSTEM_TRUSTED_KEYS ""
$ scripts/config --disable SYSTEM_REVOCATION_KEYS
$ scripts/config --set-str CONFIG_SYSTEM_REVOCATION_KEYS ""
$ scripts/config --disable CONFIG_DEBUG_INFO_BTF

$ scripts/config --disable GDB_SCRIPTS
$ scripts/config --disable DEBUG_INFO
$ scripts/config --disable DEBUG_INFO_SPLIT
$ scripts/config --disable DEBUG_INFO_REDUCED
$ scripts/config --disable DEBUG_INFO_COMPRESSED
$ scripts/config --set-val DEBUG_INFO_NONE y
$ scripts/config --set-val DEBUG_INFO_DWARF5 n
$ scripts/config --disable DEBUG_INFO_DWARF_TOOLCHAIN_DEFAULT
이제 빌드를 진행해 줍니다. (아주~~~ 좋은 PC가 아니면 대충 1시간 살짝 넘게 걸리는 듯 합니다. )
$ make -j4 bindeb-pkg빌드가 완료되면, 생성된 deb 파일을 이용하여 커널을 설치해줍니다.
$ cd ..
$ sudo dpkg -i *.deb
설치를 완료한 이후, 몇가지 설정을 진행해 줍니다.
일단 xenomai 관련한 기능을 sudo 명령없이 사용하도록 현재 유저를 xenomai 그룹에 추가해줍니다.
$ sudo addgroup xenomai
$ sudo addgroup root xenomai
$ sudo usermod -aG xenomai $(whoami)
Group ID (GID)를 찾아봅니다.
$ cat /etc/group | grep xenomai
1001
다음으로 GRUB의 부팅 옵션을 추가해줍니다.
$ sudo vi /etc/default/grubGRUB_DEFAULT=saved
GRUB_SAVEDEFAULT=true
#GRUB_TIMEOUT_STYLE=menu
GRUB_TIMEOUT=10
GRUB_DISTRIBUTOR=`lsb_release -i -s 2> /dev/null || echo Debian`
GRUB_CMDLINE_LINUX_DEFAULT="quiet splash nomodeset i915.enable_rc6=0 i915.enable_dc=0 noapic xenomai.allowed_group=1001 isolcpus=0,1 xenomai.supported_cpus=0x3"
GRUB_CMDLINE_LINUX=""
GRUB_GFXMODE=1280x1024
GRUB_GFXPAYLOAD_LINUX=1280x1024옵션 중 몇 가지를 설명해보면,
xenomai.allowed_group=1001     % 생성한 그룹의 사용자들이 xenomai를 사용할 수 있도록 권한 부여
isolcpus=0,1                   % CPU0, CPU1을 일반 커널에서 사용하지 못하도록 Isolation
xenomai.supported_cpus=0x3     % CPU0, CPU1을 Xenomai에서 사용하도록 설정
update-grub를 실행하여 변경된 옵션을 적용합니다.
$ sudo update-grub
$ sudo reboot
다음으로 XDDP (비실시간 커널과 실시간 커널과의 통신을 위한 IPC 방법 중 하나)를 사용하기 위해 퍼미션을 설정해줍니다. udev 룰을 이용하여 권한을 부여할 수 있습니다.
$ sudo vi /etc/udev/rules.d/99-xenomai.rules

KERNEL=="rtp[0-32]*", MODE="0666"
SUBSYSTEM=="rtdm", MODE="0666"
다음으로 XDDP 커널 모듈을 부팅 시에 자동으로 로딩하도록 설정합니다.
$ sudo vi /etc/modules

xeno_rtipc
이제 재부팅해줍니다. 재부팅시 설치된 실시간 커널 버전을 선택해줍니다.
커널 버전 확인
$ uname -a
Linux former-0030 6.1.61-xenomai #5 SMP PREEMPT_DYNAMIC IRQ_PIPELINE Fri Nov 17 16:46:35 KST 2023 x86_64 x86_64 x86_64 GNU/Linux
XDDP 커널 모듈 로딩 확인
$ lsmod | grep xeno
xeno_rtipc
Xenomai 라이브러리를 설치해줍니다. 먼저 빌드를 위한 패키지 필요 패키지를 설치합니다.
$ sudo apt install fuseXenomai 라이브러리를 빌드하고 설치합니다.
$ cd ~/tmp/xenomai-v3.2.4
$ ./scripts/bootstrap
$ ./configure --with-pic --with-core=cobalt --enable-smp --disable-tls --enable-dlopen-libs --disable-clock-monotonic-raw
$ make -j4
$ sudo make install
PATH 환경변수에 Xenomai bin 경로를 추가하고,
$ echo "export PATH=/usr/xenomai/bin:$PATH" >> ~/.bashrc라이브러리를 추가해줍니다.
$ sudo vi /etc/ld.so.conf.d/xenomai.conf

/usr/xenomai/lib

$ sudo ldconfig
설치 완료
테스트용 코드를 하나 만들어서 잘 동작되는지 확인해보겠습니다.
#include <stdio.h>
#include <signal.h>
#include <unistd.h>
#include <alchemy/task.h>

RT_TASK demo_task;

void demo(void *arg)
{
  RT_TASK_INFO curtaskinfo;
  rt_task_inquire(&demo_task, &curtaskinfo);
  printf("Task name : %s \n", curtaskinfo.name);
}

int main(int argc, char* argv[])
{
  char *str = "demo";

  printf("start task\n");

  rt_task_create(&demo_task, str, 0, 50, 0);
  rt_task_start(&demo_task, &demo, 0);

  sleep(1);
}
$ gcc -o hello_xenomai hello_xenomai.c $(xeno-config --posix --alchemy --cflags) $(xeno-config --posix --alchemy --ldflags)
$ ./hello_xenomai
start task
Task name : demoLatency도 확인해봅니다.
$ sudo sh -c "echo 0 > /proc/xenomai/latency"
$ latency
== Sampling period: 100 us
== Test mode: periodic user-mode task
== All results in microseconds
warming up...
RTT|  00:00:01  (periodic user-mode task, 100 us period, priority 99)
RTH|----lat min|----lat avg|----lat max|-overrun|---msw|---lat best|--lat worst
RTD|      1.919|      1.963|      3.277|       0|     0|      1.919|      3.277
RTD|      1.922|      1.964|      4.412|       0|     0|      1.919|      4.412
RTD|      1.914|      1.958|      3.316|       0|     0|      1.914|      4.412
전체적으로 100us 제어 주기에 약 4us latency가 발생합니다. 이는 User 모드 (dovetail을 통해서 xenomai 커널에 접근)인 경우에 그렇고, 커널 모드 or 커널 IRQ 모드로 실행하면 좀 더 좋은 성능이 나옵니다.
완료.
Ubuntu에서 ifconfig, ip 등의 명령어를 이용하여, 현재 연결된 상태 및 IP 등을 확인할 수 있다. 하지만, 현재 연결된 네트워크 카드의 디바이스명이나 연결된 인터페이스 이름을 확인하려면 다음의 명령으로 가능하다.
여러 개의 Ethernet 포트가 있고, 서로 다른 디바이스로 구성되어 있는 경우, 특정 디바이스에만 연결해야 하는 경우에 필요하다.
$ sudo lshw -c network위와 같이 입력하면, 현재 시스템에 있는 모든 네트워크 디바이스의 리스트와 상세한 정보를 보여준다. 예를 들자면,
 *-network
       description: Ethernet interface
       product: I210 Gigabit Network Connection
       vendor: Intel Corporation
       physical id: 0
       bus info: pci@0000:02:00.0
       logical name: enp2s0
       version: 03
       serial: c4:00:ad:c4:85:3d
       size: 100Mbit/s
       capacity: 1Gbit/s
       width: 32 bits
       clock: 33MHz
       capabilities: pm msi msix pciexpress bus_master cap_list rom ethernet physical tp 10bt 10bt-fd 100bt 100bt-fd 1000bt-fd autonegotiation
       configuration: autonegotiation=on broadcast=yes driver=igb driverversion=6.2.0-34-generic duplex=full firmware=3.25, 0x800005d0 latency=0 link=yes multicast=yes port=twisted pair speed=100Mbit/s
       resources: irq:17 memory:80480000-804fffff ioport:3000(size=32) memory:80500000-80503fff memory:80400000-8047ffff
현재 이 네트워크 디바이스는 Intel사의 i210 칩셋을 사용하는 기가빗 네트워크를 지원한다는 것을 알 수 있다. 또 현재 enp2s0라는 인터페이스 이름으로 연결되어 있다.
현재 사용하고 있는 노트북이 XPS17 9700인데, 2020년 11월에 샀으니, 이제 대략 2년 8개월 정도 사용한듯 합니다. 얼마전부터 배터리 관련해서 경고가 계속 발생하고, 배터리로 사용할 수 있는 시간이 현저히 줄어들기 시작해서 거슬렸는데… 델 서포트를 2011년 이후에 연장을 하지 않은 관계로, 유상 수리만 가능한 상황이었습니다.
기존에도 SSD 추가나, 램 추가 등등의 작업들은 직접 해놨던 터라 일단 배터리를 구매할 수 있는지 찾아봤는데, 나름 많이 사용되는 모델이라서 그런가 중국 어느 가게에서 판매하는 것을 발견… 스펙 확인하고.. 주문…
오늘 도착해서 교체 완료했습니다.
배터리 상태를 확인해보니, 거의 반토막난 수준이었네요.. 교체는 뒷판만 분리하고, 나사 몇개만 풀면 되서 아주~~~ 간단합니다.
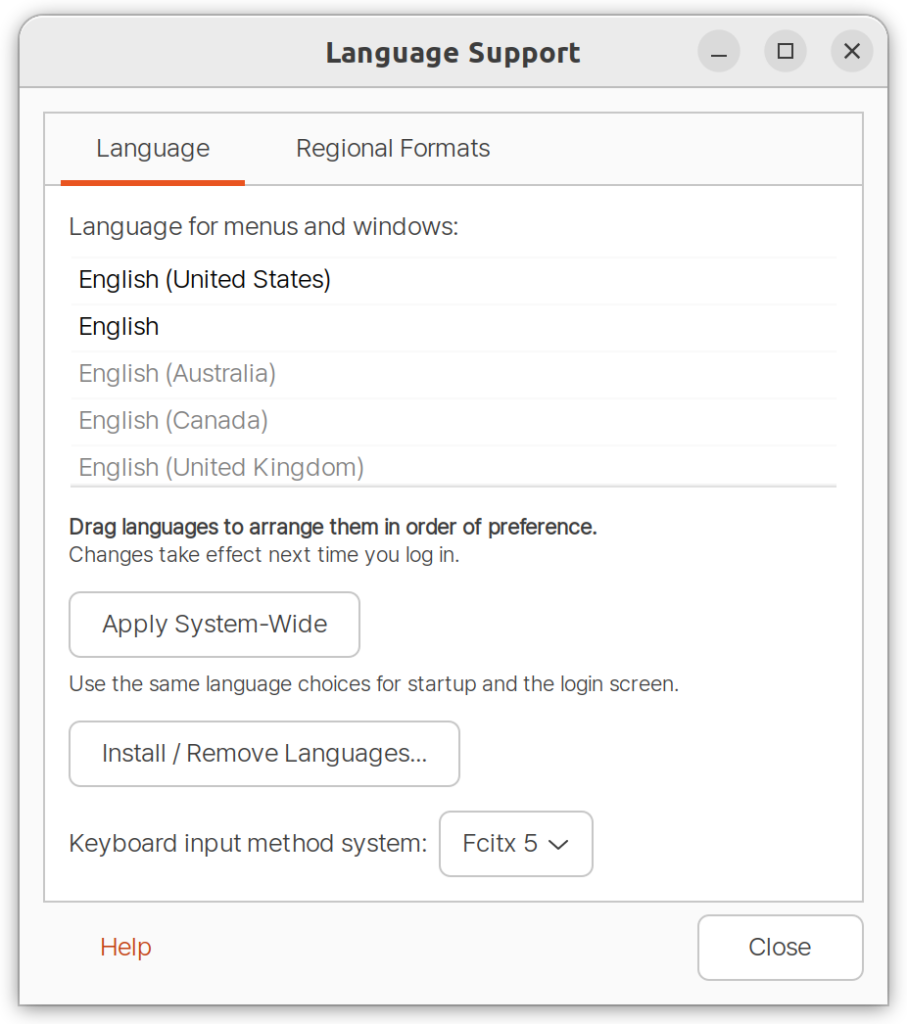
fcitx5, fcitx5-hangul 설치
$ sudo apt install fcitx5 fcitx5-hangulSetting > Region and Language > Manage Installed Langugages
한글입력 방식을 IBUS에서 fcitx5로 변경.
재부팅.
메뉴 상단에 키보드 표시가 있는지 확인

키보드 표시에서 오른쪽 버튼을 눌러 Configure 선택하여 설정창 진입
왼쪽 사용할 입력 방식에 다음과 같이 추가. Hangul이 안보이면, 오른쪽 하단, Only Show Current Language를 클릭 해제.
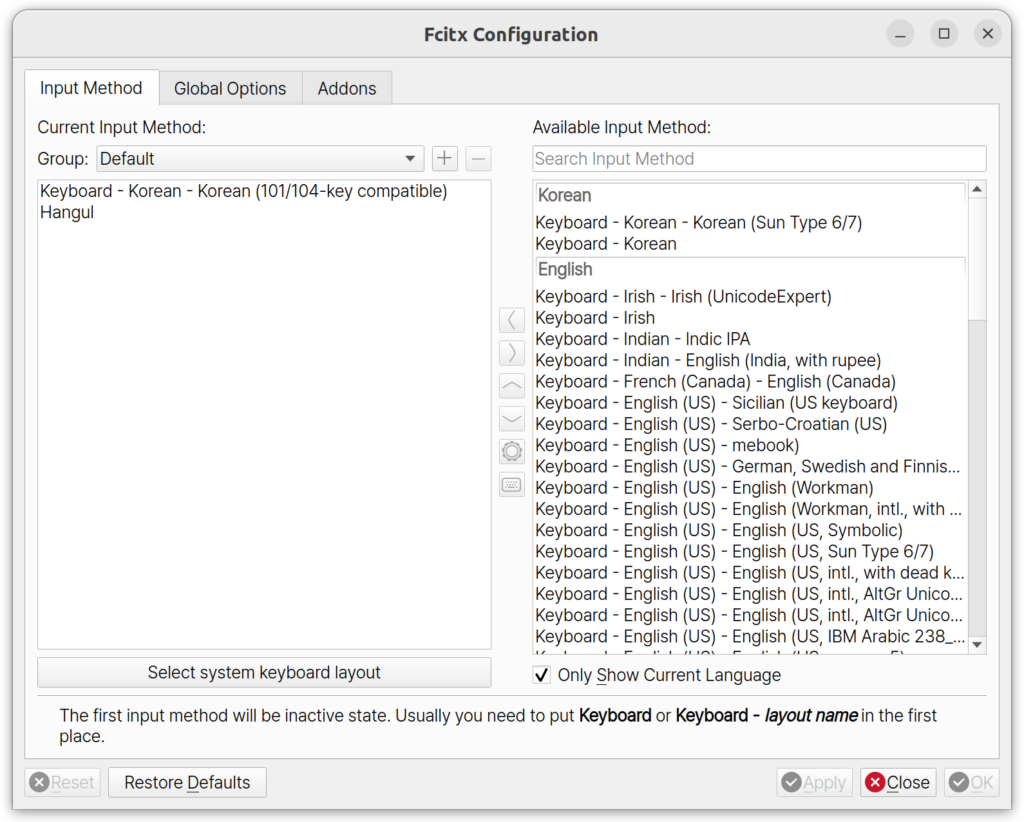
다음으로 한영키 설정. 영문환경에선 한영 변환키가 Right Alt로만 인식됨. Right Alt로 사용할 경우, 간헐적으로 메뉴 호출과 혼동되어 사용되므로 번거로움. 이를 해결하기 위해서 gnome-tweaks 패키지를 설치함.
$ sudo apt install gnome-tweaksTweaks 앱을 실행
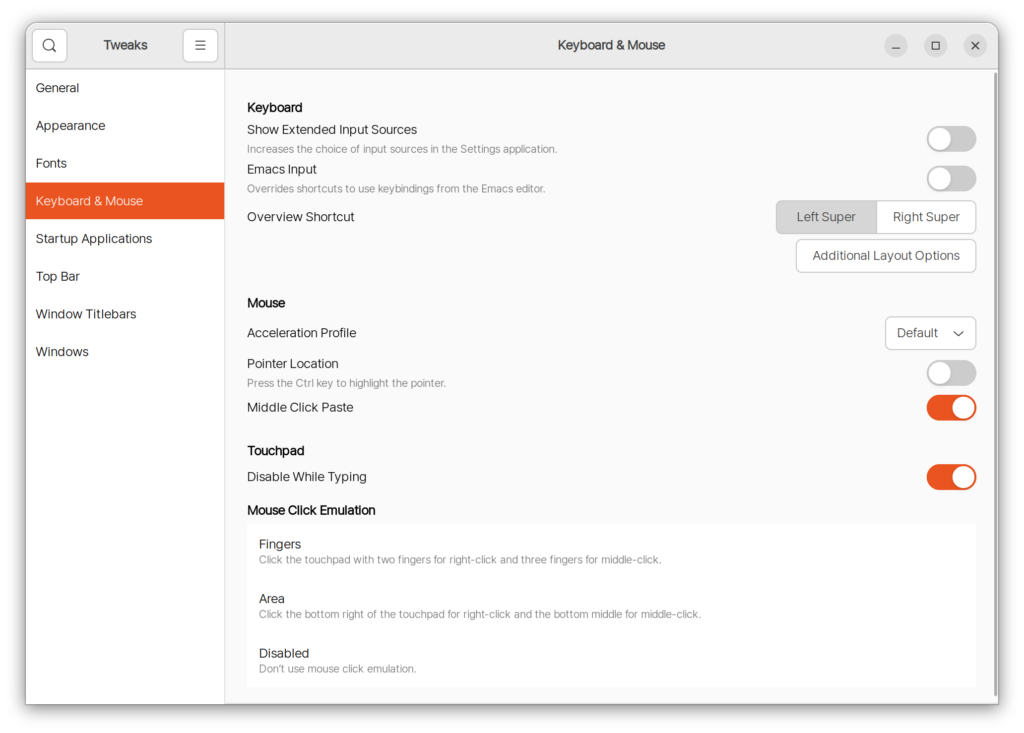
키보드&마우스 설정으로 가서 Additional Layout Options를 선택
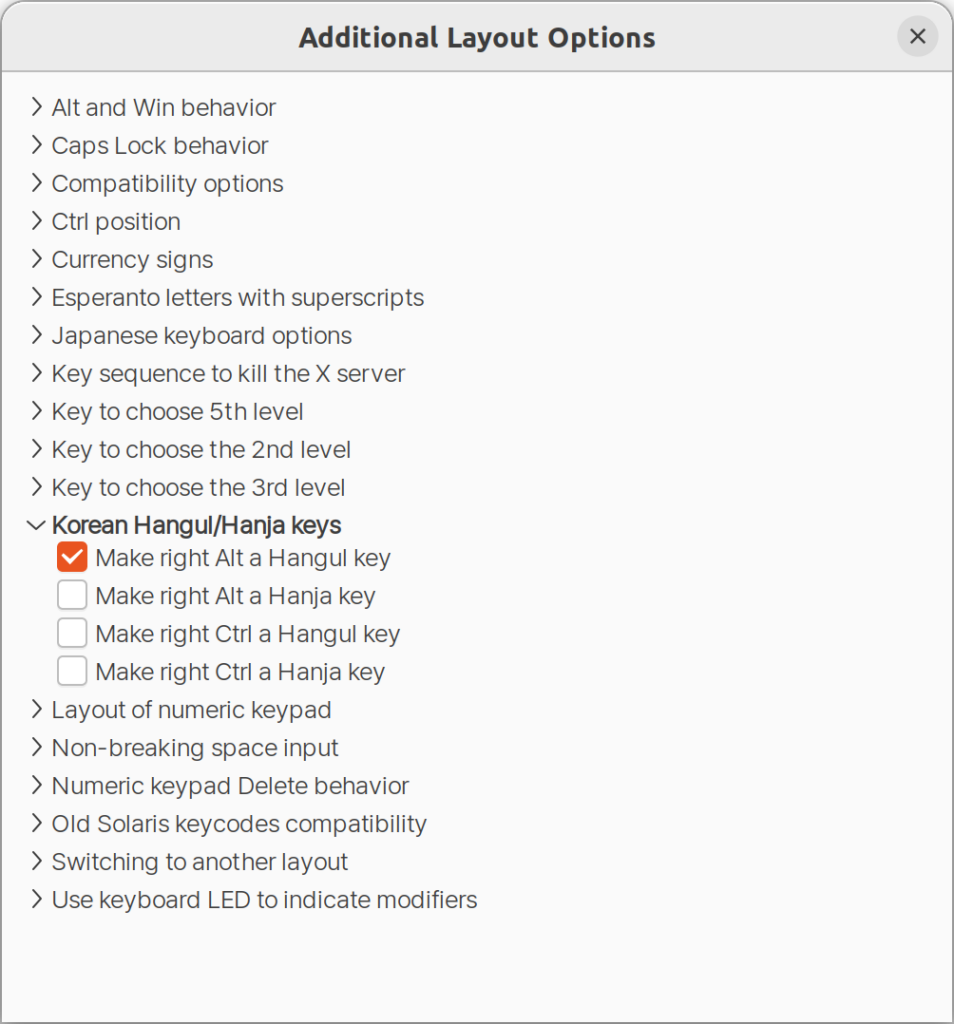
Korean Hangul/Hanja Keys로 이동하여 Right Alt를 Hangul key로 사용에 체크
이제 다시, fcitx5 설정으로 돌아가서,
Triger Input Method에서 선택하여 Right Alt키를 누르면 Hangul키로 인식되는 것을 확인할 수 있음.
끝!
docker 내부에서 GUI 프로그램을 실행해야 할 경우, 다음과 같이 설정합니다.
먼저 host 머신에서 docker가 x윈도우에 접근 가능하도록 권한을 설정합니다.
$ xhost +local:docker다음으로 docker 컨테이너를 실행할 때, 다음과 같이 옵션을 추가합니다.
$ docker run --rm -it --runtime nvidia -e DISPLAY -e NVIDIA_DRIVER_CAPABILITIES=all -e NVIDIA_VISIBLE_DEVICES=all -v /tmp/.X11-unix:/tmp/.X11-unix ubuntu 옵션을 설명하면
-e DISPLAY : GUI가 출력될 DISPLAY 환경변수 전달-e NVIDIA_DRIVER_CAPABILITIES=all : NVIDIA 드라이버 관련 라이브러리, 바이너리를 Docker 내부에 마운트 하기-e NVIDIA_VISIBLE _DEVICES=all : Docker 내부에서 사용할 GPU 설정-v /tmp/.X11-unix:/tmp/.X11-unix : X윈도우를 사용하기 위한 소켓 연결위와 같이 옵션을 설정하고 실행 후, 내부에서 GUI 프로그램을 설치하고 실행하면 됨.
$ docker run --rm -it -v /tmp/.X11-unix:/tmp/.X11-unix -e DISPLAY --runtime nvidia -e NVIDIA_DRIVER_CAPABILITIES=all -e NVIDIA_VISIBLE_DEVICES=all ubuntu
root@92913cdca2a1:/# glxgears
Running synchronized to the vertical refresh.  The framerate should be
approximately the same as the monitor refresh rate.
그외 gtk 관련 프로그램도 정상적으로 실행되는 것을 확인할 수 있습니다.
삽질 기록
1) 위 -e NVIDIA_DRIVER_CAPABILITIES=all -e NVIDIA_VISIBLE_DEVICES=all 옵션을 사용하지 않는 경우, 다음과 같은 에러가 발생하고 실행이 되지 않음.
X Error of failed request:  BadShmSeg (invalid shared segment parameter)
  Major opcode of failed request:  130 (MIT-SHM)
  Minor opcode of failed request:  3 (X_ShmPutImage)
  Segment id in failed request:  0x2e00005
  Serial number of failed request:  54
  Current serial number in output stream:  55
2) Host 머신에서 권한 설정을 해주지 않으면, 실행 불가
Authorization required, but no authorization protocol specified
cannot open display: :1
참고링크: https://docs.nvidia.com/datacenter/cloud-native/container-toolkit/user-guide.html
docker를 설치하고, 내부로 진입해서 이런저런 작업을 진행할 때, bash의 자동완성 기능이 없어 매번 타이핑을 해야하는 불편한 점이 있습니다. 예로 apt install 후 패키지명을 수동으로 전체 입력해야 하는 것과 같은 점이요.
bash-completion이 설치되지 않아서인데, 다음과 같은 과정으로 진행하시면 쉽게 해결이 가능합니다.
$ apt install bash-completion vim
$ vi /etc/bash.bashrc

주석 해제
# enable bash completion in interactive shells
if ! shopt -oq posix; then
  if [ -f /usr/share/bash-completion/bash_completion ]; then
    . /usr/share/bash-completion/bash_completion
  elif [ -f /etc/bash_completion ]; then
    . /etc/bash_completion
  fi
fi

$ source /etc/bash.bashrc
$ rm /etc/apt/apt.conf.d/docker-clean
$ apt update
이제 apt 명령 이외에도 bash 쉘에서 자동 완성 기능을 사용할 수 있습니다.
17 responses